Cách lắp đặt Trạm định hình nguội Máy Ép vỉ
DPP260 series Blister Packaging Machine cold-forming mould installation:
The working principle of the cold-forming station in the Blister Machine.
When the Blister Machine is working, the forming cam drive the forming lower mould (18) upward to press the aluminum film tightly between the press plate (12) and lower forming mould (18), meanwhile the cover plate (14.2) was driven by the eccetric wheel (1) to move downward. The punch dies (16) which was installed in the cover plate will elongate the aluminum film to form the blister cavity. The forming depth of the blister cavity can be adjusted by the nuts (13) and (15).
Installation.
Use the hand barring gear to run the Blister Machine to its highest position (the forming cam at the highest position). Putting the lower forming mould (18) on the forming station, screw the nuts (11.1) into each of the four forming column (9.2), install the press plate (12), adjust the nuts (11.1) downward let the press plate touch the lower forming mould, screw the nuts downward more untill the gap between the naus and the press plate is about 1-2mm.
Putting butterfly washer (21) (two pcs for each column) and another set of nut (11.2), to insert the positioning pin (19) into the press plate and forming lower mould to make sure the lower mould position is aligned with press plate, fix the forming lower mould by screw, then take the positioning pin (19) out, screw the nuts (11.2) downward to press the butterfly washer (21) but not tightly at this step. Install the forming punches mould (16), nuts (15) and the forming cover plate (14.2), lastly install nuts (13), but do not fasten them at this step.
Testing the cold-forming station:
Use the hand barring gear to run the blister machine to its lowest position, let the aluminum film enter into the forming station, screw the nuts (11.2) downward to press the butterfly washer (21) create pressure between the press plate (12) and lower forming mould (18), fasten the aluminum film tightly.
Use the hand barring gear to run the Blister Machine to its highest position and the punch ties pushed into the aluminum film.
During the testing of the Blister Machine, need to adjust the pressure between the press plate (12) and lower forming mould (18), need have enought pressure to press the aluminum film tightly, so the punch die can elongate the film and form the blister pocket, always try to use less pressure to form the blister properly becaure larger pressure is harmful for the Blister Machine, when adjustment is finished screw the nuts (11.1) upwards to fasten the press plate (12).
During testing the Blister Machine need to adjust the nut (13) and (15) to control the forming depth of the blister cavity, the forming depth of the aluminum film is limited, too deep elongation will break the film or make some tiny pin hole, it is not easy to inspect by naked eye, so be aware of this, after adjusting the forming depth fasten the nuts (13) and (15).
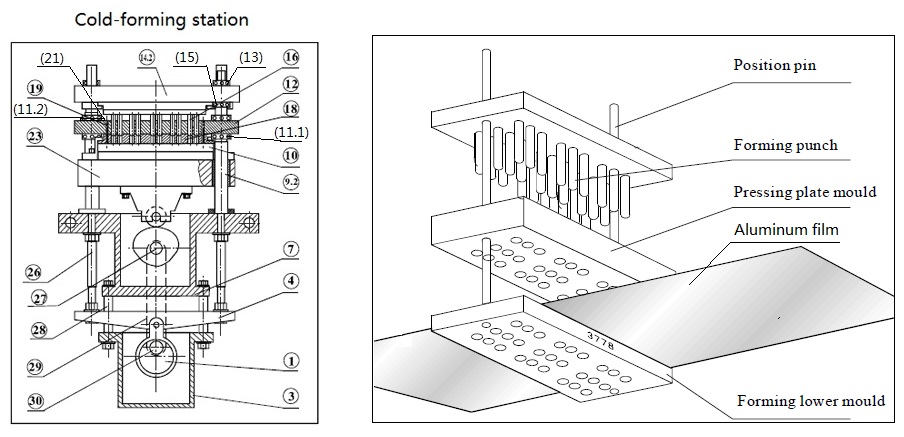
The schematic diagram of DPP series Blister Machine’s cold-forming station.
The working principle of the cold-forming station in the Blister Machine.
When the Blister Machine is working, the forming cam drive the forming lower mould (18) upward to press the aluminum film tightly between the press plate (12) and lower forming mould (18), meanwhile the cover plate (14.2) was driven by the eccetric wheel (1) to move downward. The punch dies (16) which was installed in the cover plate will elongate the aluminum film to form the blister cavity. The forming depth of the blister cavity can be adjusted by the nuts (13) and (15).
Installation.
Use the hand barring gear to run the Blister Machine to its highest position (the forming cam at the highest position). Putting the lower forming mould (18) on the forming station, screw the nuts (11.1) into each of the four forming column (9.2), install the press plate (12), adjust the nuts (11.1) downward let the press plate touch the lower forming mould, screw the nuts downward more untill the gap between the naus and the press plate is about 1-2mm.
Putting butterfly washer (21) (two pcs for each column) and another set of nut (11.2), to insert the positioning pin (19) into the press plate and forming lower mould to make sure the lower mould position is aligned with press plate, fix the forming lower mould by screw, then take the positioning pin (19) out, screw the nuts (11.2) downward to press the butterfly washer (21) but not tightly at this step. Install the forming punches mould (16), nuts (15) and the forming cover plate (14.2), lastly install nuts (13), but do not fasten them at this step.
Testing the cold-forming station:
Use the hand barring gear to run the blister machine to its lowest position, let the aluminum film enter into the forming station, screw the nuts (11.2) downward to press the butterfly washer (21) create pressure between the press plate (12) and lower forming mould (18), fasten the aluminum film tightly.
Use the hand barring gear to run the Blister Machine to its highest position and the punch ties pushed into the aluminum film.
During the testing of the Blister Machine, need to adjust the pressure between the press plate (12) and lower forming mould (18), need have enought pressure to press the aluminum film tightly, so the punch die can elongate the film and form the blister pocket, always try to use less pressure to form the blister properly becaure larger pressure is harmful for the Blister Machine, when adjustment is finished screw the nuts (11.1) upwards to fasten the press plate (12).
During testing the Blister Machine need to adjust the nut (13) and (15) to control the forming depth of the blister cavity, the forming depth of the aluminum film is limited, too deep elongation will break the film or make some tiny pin hole, it is not easy to inspect by naked eye, so be aware of this, after adjusting the forming depth fasten the nuts (13) and (15).
The schematic diagram of DPP series Blister Machine’s cold-forming station.